Wednesday, September 21

Blocking


I guess I'll start with the prep steps for blocking.  You see, I have never had to block anything before.  For those of you who are reading this because I'm writing it rather than because you are actually interested in these crafts, blocking is the process of pinning a piece of fabric, either wet or damp, so that it dries in the desired size and shape.  Since I have mostly done scarves and socks, I have never even gotten a blocking board.  With the afghan I am working on, I wanted to make sure all the blocks were square and the same size, hence the need for blocking.  I didn't really like the current blocking boards available, so I decided to make my own.  I know, how weird do you have to be, right?


Well, there were a few characteristics that I really wanted that were not commercially available.  I wanted a board that would not adsorb water that might warp it or would have to evaporate back through the fabric.  It had to be soft enough to use straight pins, firm enough to hold its shape against the tension of the fabric, and light enough to move about easily.  My final requirement was that it possess a one-inch grid so that I did not have to get out a ruler and square every time I wanted to block something.  With these thoughts in mind, I went shopping.  I found  children's foam playmats very inexpensively online.  They fit the majority of my requirements.  The only thing lacking was the grid, but I figured I could do that myself.
These tools made it possible: a large square, a straight edge, ultra fine point permanent marker. I tried to use just the pens and the lines that are naturally on the mat.  Let me tell you, the lines are not straight.  So, the first block has a few slightly curved lines.  I still don't know what I'm going to do about that one.  So I grabbed a meter stick for straight lines and a square to make sure I made squares rather than parallelograms (crooked squares for those who took geometry as long ago as I did) and a few hours produced this.
So, now I had a grid.  Exactly 1" squares all over.  Then came the less labor intensive, but more time consuming process of actually blocking.  I could fit 4, 7" squares on each of my new blocking boards.  Since I was doing wet blocking, I would set each square in water before pinning it to the board.  Some of them took more work than others to make fit the 7" ideal, but I did eventually get all of them blocked.  I blocked them in batches letting each set dry roughly 12 hours.  Some of them took longer.  If I touched one and it wasn't dry, I left them to dry until I checked them another 12 hours later.


My next post should include joining the squares and maybe I'll be able to report progress on my socks.

Saturday, September 10

Busy, Busy, Busy

So much has been happening this last week.  Blocking, winding, knitting, cooking, where to start?

Lets start with the blocking.  This was my first time blocking.  I wound up making my own blocking boards, which I will cover in more detail in a later post.  Since I am blocking wool, I decided to do wet blocking.  For those who are reading this because I write it rather than because you are actually interested in all this craft stuff, blocking is when you pin a damp or wet piece of fabric so that it dries to a specific shape and size.  It took about one week for me to block all 52 squares once I finished the blocking boards.  The next step is to lay the blocks out to decide how to arrange them in the final afghan.

Since blocking is not very labor intensive (set and walk away), I found time to finish the first ball of yarn for my socks and wind the second ball for each.  The winding process being greatly facilitated by my mother's willingness to act as a human swift.  For some perspective, this is what 618 yards of yarn look like a balls (309 each).

This is what 618 yards of yarn looks like as socks.

I am very glad I decided to invest in a yarn ball winder.  This making 3 balls of yarn I've wound on it, each yard cost roughly $0.02 at this point.  Having wound more than a few by hand before I got it, I think it was worth every penny.  A simple yarn swift may be one of my next investments.

Our garden has also been busy producing lots of fresh vegetables.  I must admit, a good number of those veggies don't even make it into the house.  A cherry tomato still warm from the sun and fabulously sweet is one of my favorite things about having a garden.  This year, we are growing pumpkins for the first time.  So, it is our first time trying make pumpkin pie from an actual pumpkin or roasted pumpkin seeds.  The pie was my sister's domain, the seeds were mine.  The pies came out delicious.  The seeds took a little more trial and error.  For example, if you are doing seeds in the oven, a little oil goes a long way.

I guess that does it for this week.  Until next time!

Saturday, August 27

Delayed Reporting

Last week I hit the 100th row after the heel.  Yay!  I even went out later that day to get a blizzard with my family to celebrate.  Truth, I was the only one who was celebrating my knitting, the family just likes ice cream.  This would probably be a more impressive milestone if I remembered how many rows I needed after the heel.  Looking at it, it is hard to gage.  Probably means I ought to dig out my notes to see what my math said when I started messing with the original pattern.  By a strange, meaningless coincidence, my car's odometer flipped to 40,000 earlier in the week.

Other news I am happy to report is the first floral display from my mother's african violet since moving into my office's window sill. The flowers are daintier than the ones on my african violet that has yet to bloom since I moved.  Maybe it would be happier in my office, too.

We are also dealing with all the excitement Mother Nature decided to deal the north eastern coast recently.  The earthquake shattered my nerves, but no permanent damage to either my home or office.  Now we are battening down the hatches for Irene's visit this weekend.  I'll post again next week with my hurricane progress on the socks.

Sunday, July 10

Preservation from the Garden

Before
After
Summer is progressing nicely here in northern Virginia.  Some of the plants and seeds we planted in the garden have not done well.  However, enough of the plants are very happy that our garden looks like a jungle.  Having lots of some herbs,  I have decided to venture into the art of preserving our garden produce.  My first attempt has been with drying herbs. I have had moderate success drying camomile flowers.  This time, I decided to try drying some of our basil.  Basil has a very high moisture content when picked.  This means that I can't dry it in a paper bag on the counter the way I have been drying the camomile; it would spoil before it dried.  So, I decided to try drying it in the oven.  I turned the oven on the lowest setting while I prepared the basil leaves, turning it off just before I put the leaves in.  The heat was to get rid of the majority of the humidity in the oven.  I turned the oven on for a few seconds again before turing in for the night.  The basil was in the oven for approximately 10 hours.  As you can see in the before and after pictures, the basil shrunk a LOT in the drying process.  I am storing the leaves in a cleaned glass jar.  We may not know how effective this preservation technique was until sometime this winter, after fresh basil is no longer an option.  I may try ice preservation next time I preserve basil.  Has anyone else ever tried preserving their garden produce?  Any success stories?  Please share in the comments.

Friday, July 1

Progress

Working a full time job and owning a very energetic puppy has had two effects on my crafting.  First, I have lots of inspiration.  I have plans for a puppy carrying purse that currently qualifies as a work-in-progress, half assembled in the basement.  I would like to make a nice vest to go over my button up shirts and have some sketches for that.  How ever the second effect is that I no longer have the energy to really work on more than one project at a time.  As you can see from the picture, though I have made progress on my socks, I still have a long way to go.

Some of you may have noticed Udvar sunning himself in the background.  This is in part because he loves lying in the sun and in part because he is all wet.  You see he had his first bath today.  I wa not the only one involved in this process.  My sister gave me her old dog shampoo, my younger brother helped with judicious application of bacon and my folks contributed the VERY deep sink.  Helpful since Udvar doesn't like getting wet.  However, quality time in the sun has dried him off sufficiently for me to consider puppy cuddle time while I try to make progress on my socks.  Until next time!

Saturday, May 28

Baseball!

For those of you who are unaware: It's baseball season!!!  There are a few things I love about baseball.  One, it's a fairly straight forward game.  Two, I actually understand all that's going on.  Three, it's knitter friendly.  In late March, I joined my father and younger brother at a game right here in the DC area.  The Twins, my dad's team and one that I enjoy watching immensely, played the Orioles in Baltimore.  The best part, they won!  Yes, I took my knitting.  The little Knitpickers bag was just perfect for carrying my socks and my phone.  It also did double duty as a ticket display so I didn't have to keep pulling it out every time we reached a check point.  I finished the gusset on the first sock on the several-hour-long drive up to Baltimore (oh the joys of rush hour).  In spite of a very exciting game, I still managed to finish the first heel flap during the game and the gusset section on the second sock.  My own little Stitch 'n' Pitch.  As you can see we had great seats, just on the third base side of home plate.  We were on one of the upper levels and took a break just before the game started to grab a surprisingly good supper from one of the restaurants in the stadium.  Our seats also seemed like a prime flyball-zone.  Two were close enough that the guys had a shot at getting them.  So much fun!

After the game, I kind of stalled on my socks.  The gusset portion is rather tedious.  Fortunately, the heel flap is quick and easy, with just enough of a pattern to keep me interested.  Since then, I feel like my socks have been flying, though when I look at them they don't look nearly long enough yet.  I crunched some numbers and figured out the increases needed in my gage to turn the socks into knee-highs.  I'm even replicating part of the pattern in the increase portion of the sock.  Honestly, with such a pretty pattern, I could not resist.  Especially since I'm using stash yarn that I know I have enough of.  So, the increased are coming along and every now and then I'll try the socks on just to check.  They are snug without being too tight.  I'm looking forward to the finished product.

In non-craft related news, I am now employed!  The craft repercussions are two-fold.  First, I will have less time to work on any projects.  This was expected and though a little disappointing, an acceptable compromise.  The second side-effect was unexpected, more ideas!  I'm starting to think I may need a better way to record all my project thoughts.  Loose sheets of graph paper don't seem to be working as well when you have so many different project.  They tend to get mixed up.  Or stashed in a variety of places when the house gets cleaned.  Does anyone have suggestions for ways to organize projects that consist of multiple pages of doodles and notes?  Please leave a note in the comments!

Sunday, April 17

The Good, the Bad, and the Sweater

The good news is that I have made progress on my socks.  I have finally reached the turn in the heel.  The bad news is that I have well and truly broken my New Years' Knitting Resolution to not cast on another project until I finish what is on my needles.  Not only have I cast-on, but I have also cast-off, a quick project.  That project was a sweater.  Before I go into detail about the sweater, I would like to introduce you to the newest member of my family.  Please welcome Udvar!

Udvar is a rescue puppy.  He and his brother were surrendered to the Lost Dog Rescue.  Isn't he adorable!?!  Our best guess is that he's a Dachshund/Chihuahua mix.  Did you know that's actually a designer dog mix?  There are people who pay exorbitant amounts of money for the type of puppy I rescued!  We always look in the local shelters or rescues for our new pets.  Especially this time of year, there are lost of puppies and kittens who need loving homes.  They come fixed and up to date on all their shots.  As you can tell, at least some of them are much cuter than any puppy-mill puppy. If you absolutely must have a specific kind of dog, find a reputable breeder where you can meet the parents and visit the location where the puppies are living. *end puppy rant*

As you may have guessed, the sweater I made was for Udvar.  I came up with a quick, ribbed design for a puppy sweater using some old acrylic yarn I had inherited and hidden in my stash.  By quick, I mean that I finished in within a 12-hour window.  I do not intend for this sweater to be used for long.  It is a prototype pressed into service when the mornings were still cold enough to make him shiver.  I need to change the neck section and want to give it a more interesting design on the back.

In addition to knitting up quick little puppy sweaters, Udvar has increased my use of a craft that I have fallen out of the practice of using: mending.  You see, puppy teeth are very small, but very sharp.  We got him two stuffed toys shortly after bringing him home.  One has a tear smaller than my pinky nail that I will probably sew up tonight while watching TV.  The other is a favorite for tug of war and required mending of multiple holes and tears large enough for stuffing removal.  My next quick project could be a felted puppy tug toy, hopefully reducing repairs required.  The next puppy sweater will have to wait.

Monday, February 28

Different crafts don't count, right?

Last post, I mentioned that I wanted to avoid casting on a second project until I finished the project I was working on.  Since this project was crochet, it wasn't cast on.  How about only working on one project per craft at a time?  Regardless, I think this hat was worth it.

My father is a die hard Vikings fan.  One day, while the family was driving around, we realized that my nephew did not have any Vikings paraphernalia.  I decided to correct this egregious oversight.  I decided to crochet it so that it had more structure to support the horns.  Unfortunately, since I made this ad hoc, I forgot to write down the instructions.  Apparently, the little horns are a hit with my sister and her husband, which is good because they are not Vikings fans.  I'm hoping the hat is cute enough that they let him wear it frequently anyway.  :)  Though truth be told, I think he's pretty darn cute with or without the hat.

He may not need to wear a hat much longer.  The weather is warming up and we are starting to get more rain than snow.  Yesterday was nice enough that we managed to tackle some gardening projects.  I planted pea seeds in a pair of containers.  My father and I managed to wrestle our rhubarb plants out of their pots and settle them in the ground.  We've had these plants for a few years now so I'm hoping we finally get some usable rhubarb out of them this year.

Yesterday also provided time for us to go to the Capital Home and Garden Show.  We came back with a garden stool and a neat little product called Rainbow Crystal Soil.  It works like this.  You start out with the packet full of little beads about the size of the head of a sewing pin.
You then soak them in water over night and they swell up to the size of marbles and feel a bit like the tofu balls in bubble drinks.
Then you can use them as soil replacement.  I'm unsure how they will work with plants that require more nutrients than they get from water so I'm starting with some philodendron cuttings.
This plant can actually grow in just water, so I am certain they will do well in this new medium.  The Rainbow Crystal packet also gives directions for use as an air freshener.  I may try that next.  All in all, I find them to be an interesting novelty and look forward to experimenting with them.

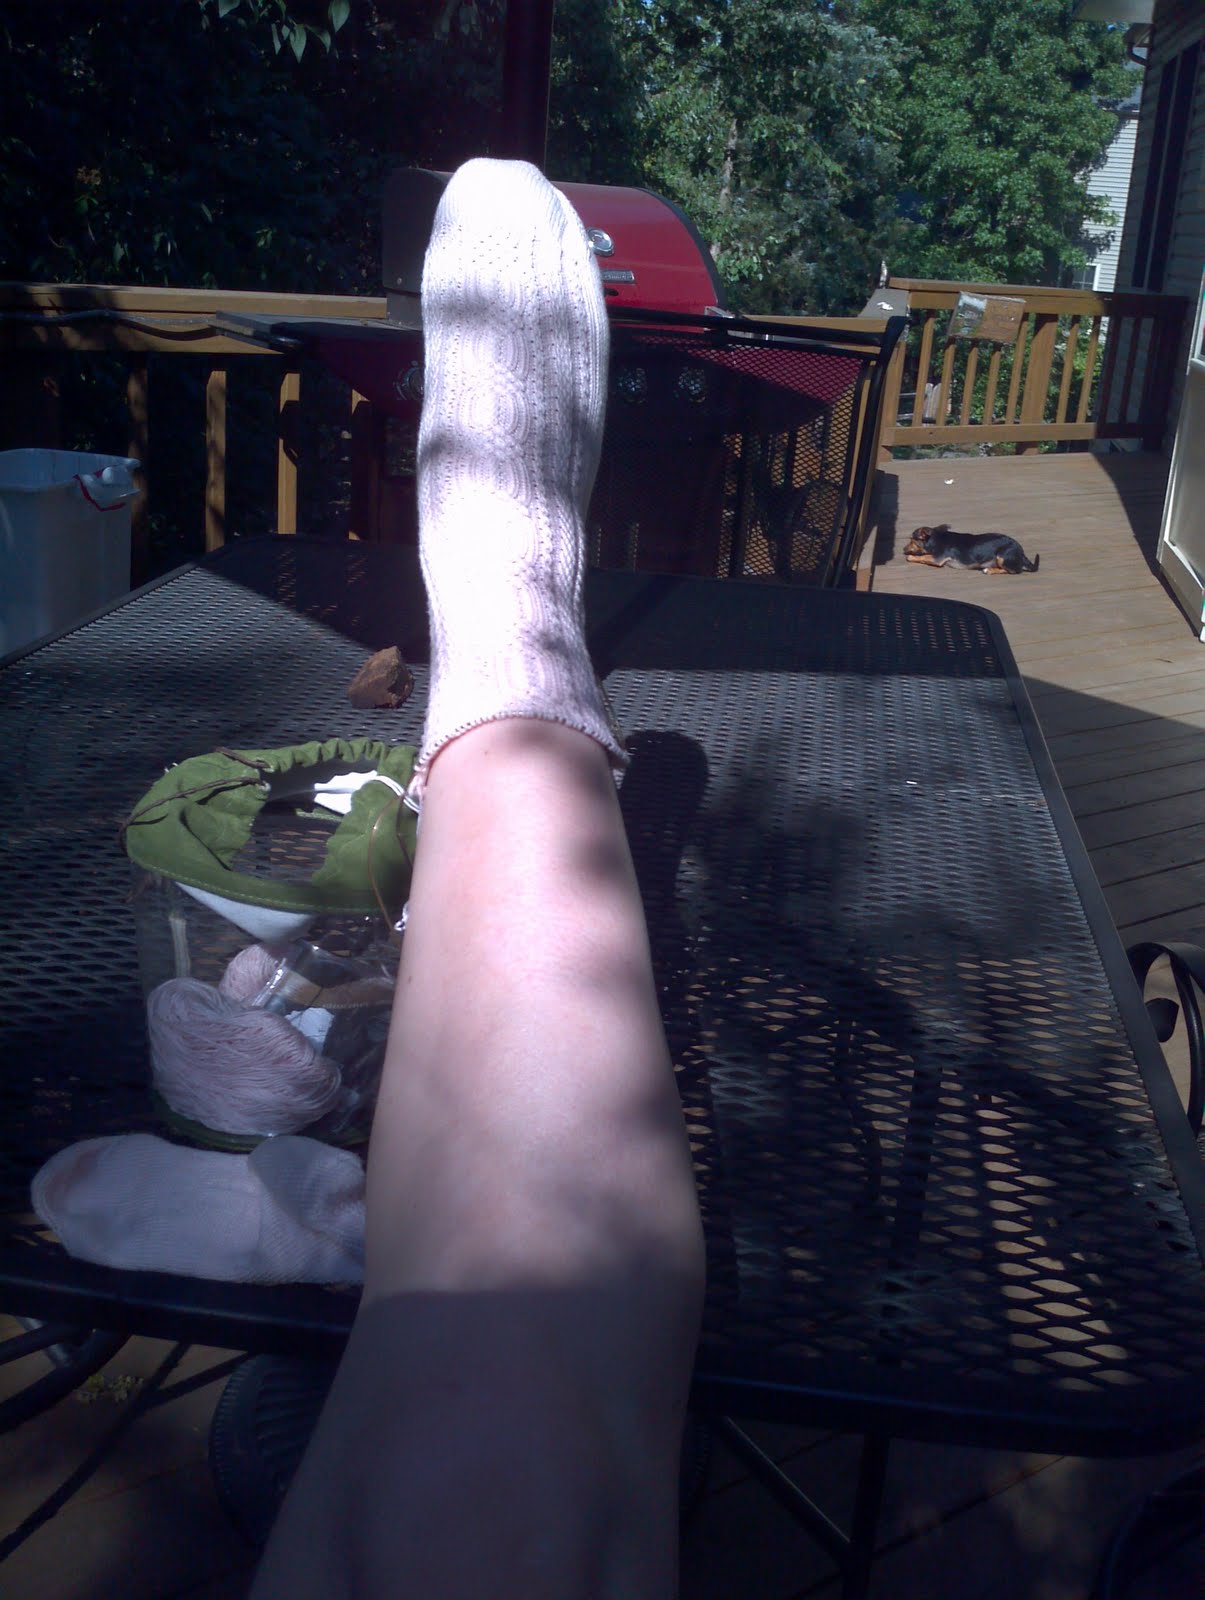
My socks are coming along nicely.  I like the cable pattern.  It's involved, but I was able to figure out the pattern enough that I no longer had to reference the chart about halfway through the first repeat.  I've reached the gusset section.  This is the first sock I've done with a gusset so I hope I started it at the right place.  I'm supposed to continue increasing until I have twice as many stitches on the sole as I have on the instep.  That's going to take a while.  I love this sock patten, especially how delicate it looks, but one of the drawbacks to knitting something this fine is that it is time consuming.  I try to work a few rows a night while I'm just sitting watching TV with the family, but it will still take a while before they are finished, especially if I tweak the design to make them knee highs.  But one hurtle at a time, I have to finish the foot and heel before I start worrying about final length.  I love that about toe-up socks!

Thursday, January 6

Happy New Year!

Happy New Year!  The first project I finished in 2011 is my Jester's scarf.  I love it!  It's worm, colorful, and unique.  A perfect pick-me-up on dreary winter days.  It ended up taking about a ball and a half of each color.  All in all, as my first entrelac project, it was fabulous!  I will probably end up doing more in the future.  I especially love lack of a wrong side that this pattern gives.  The ribbed entrelac is fun and easy.

My Knitting New Year's resolution is not to cast on a new project before I finish what I am currently working on.  I didn't quite follow that for the ribbed entrelac scarf, taking a brief hiatus to knit up a Weekend Scarf as a quick gift over the holiday season.

My first project of the New Year is a pair of toe up socks in a baby pink, cotton yarn.  I was going to use this for a baby project until my expected niece turned out to be a nephew!  So, now I am using it to cast on for a pair of Ballet socks from Melissa Morgan-Oakes 'Toe-Up 2-at-a-Time Socks' book I am borrowing from my mother's library.  I am thinking of adding an alteration to the leg portion so they can be knee highs.

I am also considering designing a pattern for my sister.  This Christmas she decided she wants to make a set of stockings for her family.  She wants to be able to personalize the tops with each family member's name.  She has a specific look she wants for the toe and heel and since no one will be wearing them, sizing is not a big issue.  I'm excited.  I love a challenge!